DATA ENGINEERING
This recipe shows how to set up a pipeline taking data from an AWS DMS source to an Iceberg mirror table.
The first stage of the pipeline will focus on configuring DMS to ingest change data from the source database into Apache Kafka. The next stage will involve using Kafka Connect to move that data from Kafka to an Iceberg changelog table. And the final stage will use Apache Spark to merge the changelog data to an Iceberg mirror table.
AWS Database Migration Service (DMS) enables us to migrate data between several different managed or on-premises data stores. With DMS, you can migrate all existing data and replicate ongoing changes. This makes it an excellent choice for populating and maintaining a mirror table in Iceberg.
This recipe assumes a few prerequisites, including an original data source that can be accessed by DMS, a Kafka cluster, and an Iceberg catalog. The example that follows uses Confluent Cloud for the Kafka cluster, and an Iceberg REST catalog, but the steps will be essentially the same for other environments.
DMS changelog data to Kafka
There are four steps to setting up DMS replication.
- Create a replication instance. This is the server that will perform the replication work.
- Set up a source endpoint to provide the information needed to connect to and read changelog data from your source database.
- Set up a target endpoint to provide connection information and credentials to write to your target store.
- Create a migration task that will do the actual work.
The replication instance and the migration task are straightforward and well-documented by AWS. Setting up the source endpoint is more involved and also very specific to the source database. You can find more information on these steps in the AWS docs.
The steps specific to this recipe start with configuring the target endpoint. To configure your Kafka endpoint, follow these steps:
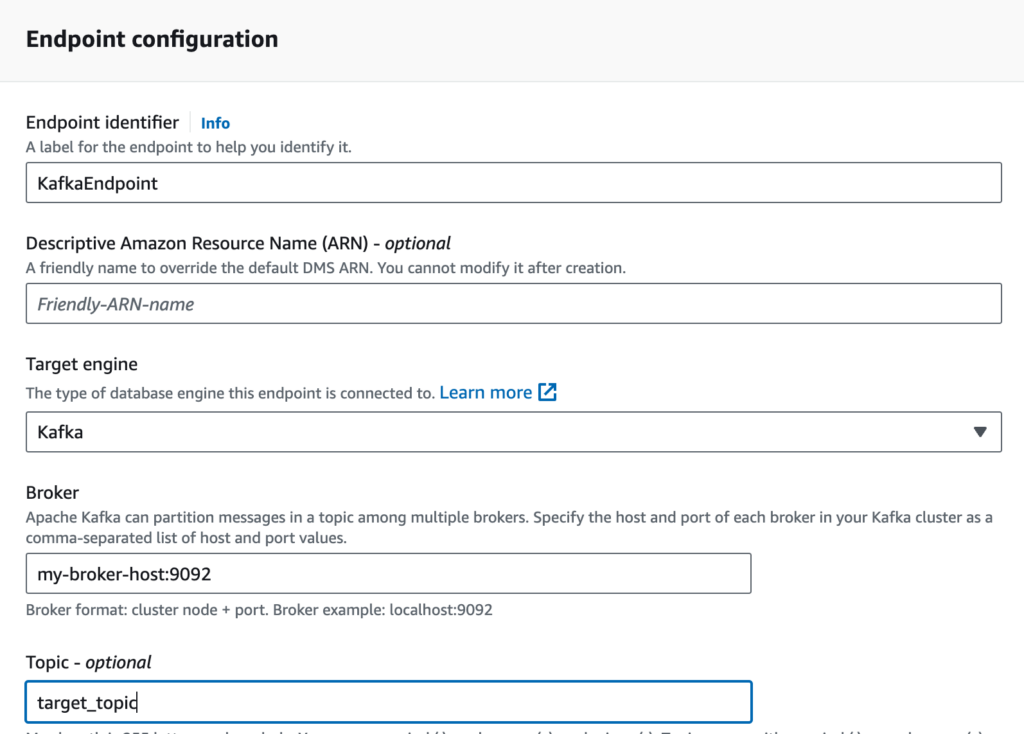
- Choose Endpoints in the DMS sidebar, then click on Create Endpoint.
- Choose Target endpoint and give your endpoint a unique name.
- From the target selection list, choose Kafka. This will uncover two additional fields.
- Enter one or more Kafka brokers in the form of hostname:port.
- Enter the name of the Kafka topic where you want the change log data to land. If your Kafka broker is not configured to allow topic auto-creation you will need to create the topic ahead of time. At this point your configuration should look something like this:
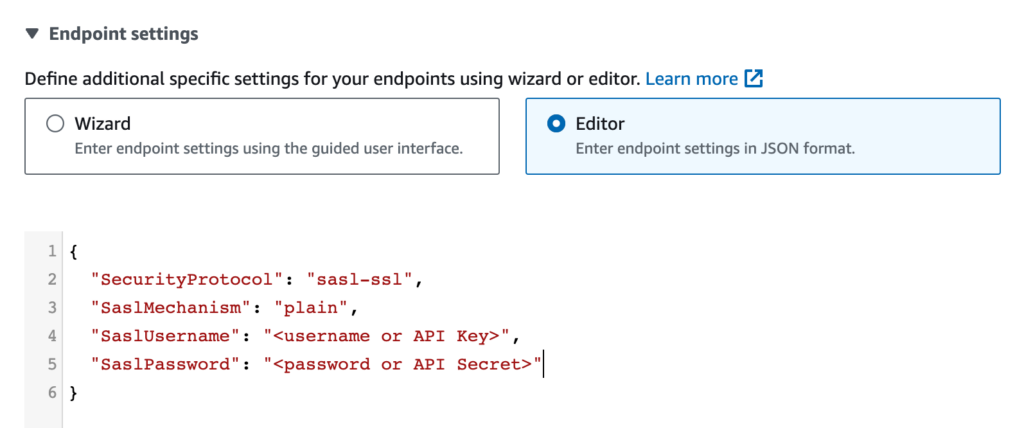
- Next, open the Endpoint Setting section and choose Editor. This will open a JSON editor where you can set security credentials for your Kafka cluster. Though specifics may change based on Kafka installation, it should be similar to this
- Now, you can test your endpoint and resolve any issues.
- Finally, create the DMS migration task using your source endpoint and your newly created target endpoint. Once it’s up and running the changelog data should be flowing into your Kafka topic.
Kafka Connect Iceberg Sink Connector
To get the changelog data from the Kafka topic into an Iceberg table, you’ll use Kafka Connect and the Iceberg Sink Connector.
Kafka Connect is an application that usually runs in a cluster. It can be run on-prem or in the cloud, and several managed options, such as Confluent Cloud and Amazon Managed Streaming for Apache Kafka (MSK), are also available.
Before using the Iceberg sink connector, you need to install it. The precise steps for installing connectors will vary based on the Kafka Connect installation. In Confluent Cloud, the Iceberg sink connector is available as a managed resource. For most other services or for on-prem installations, you will need the connector .jar file, which can be obtained from the Confluent Connector Hub.
Once the Iceberg sink connector is installed, you can launch a Connect worker by posting a JSON configuration document. Some Kafka Connect installations provide a graphical interface for this, with others you can use the REST API. To launch a new Connect worker via the REST API, just POST a JSON payload with the necessary configuration information.
Whether using a UI or the REST API, here’s an example of a configuration for a Connect worker that will read changelog events from a Kafka topic on Confluent Cloud and write them to an Iceberg table on Tabular.
{
  "iceberg.catalog.credential": "<REST-CREDENTIAL>",
  "iceberg.catalog.type": "rest",
  "iceberg.catalog.uri": "https://api.dev.www.tabular.io/ws",
  "iceberg.catalog.warehouse": "my_warehouse",
  "iceberg.kafka.sasl.jaas.config": "org.apache.kafka.common.security.plain.PlainLoginModule   required username=\"<Confluent API key>\" password=\"<Confluent API secret>\";",
  "iceberg.tables": "accounts_changelog",
  "iceberg.tables.auto-create-enabled": "true",
  "iceberg.tables.evolve-schema-enabled": "true",
  "key.converter": "org.apache.kafka.connect.storage.StringConverter",
  "topics": "accounts_cdc",
  "transforms": "dms",
  "transforms.dms.type": "io.tabular.iceberg.connect.transforms.DmsTransform",
  "value.converter": "org.apache.kafka.connect.json.JsonConverter",
  "value.converter.schemas.enable": "false"
}
Here’s a description of the items in this configuration.
iceberg.catalog.credential | Used to connect to the catalog provider, in this case, Tabular. |
iceberg.catalog.type | Standard catalog settings are covered in Catalogs and the REST catalog. |
iceberg.catalog.uri | Same as above |
iceberg.catalog.warehouse | Same as above |
iceberg.kafka.sasl.jaas.config | Used to connect to the Kafka cluster. |
iceberg.tables | Designates the table or tables that the connector will write to. Multiple tables can be separated by commas. |
iceberg.tables.auto-create-enabled | Allow the connector to create a new Iceberg table. |
iceberg.tables.evolve-schema-enabled | Enable schema evolution. |
key.converter | Converters are discussed in depth in this article. |
topics | The name of the topic to be read from |
transforms | The name of the Single Message Transform to be used by this connect worker. |
transforms.dms.type | The class of the transform |
value.converter | See key.converter above |
value.converter.schemas.enable | See key.converter above |
One thing to highlight here is the single message transform (SMT) that is signified by transforms and transforms.dms.type. This transform will convert each of the changelog events from the structure that DMS produces to the structure that you want in your downstream changelog table.
Here is the original structure from DMS:
{
  "data": {
    "account_id": 1529,
    "balance": 202,
    "last_updated": "2023-11-14T15:48:02.110644Z"
  },
  "metadata": {
    "timestamp": "2023-11-14T15:48:02.110568Z",
    "record-type": "data",
    "operation": "update",
    "partition-key-type": "schema-table",
    "schema-name": "public",
    "table-name": "accounts",
    "transaction-id": 33756331
  }
}
What you want in the downstream table are all of the fields from the data along with metadata.operation. You can get this by using the DMS transform, which will elevate the data fields to top-level fields and add a struct called _cdc containing op(U,I, or D),source (dbname.tablename), and ts(a timestamp string).
Once this connector is launched, data will flow into your Iceberg changelog table. Next, you will use a query engine to create your mirror table and merge the CDC data into it.
Merge Iceberg changelog table to mirror table
At this point you need a query engine to complete your pipeline. You can use Spark by following the configuration recipe earlier in this guide.
The following SQL will create an Iceberg table with the same fields as your original source table.
CREATE TABLE db.accounts_mirror (
    account_id bigint,
    balance bigint,
    last_updated string)
USING iceberg
The final step in setting up the pipeline is to merge the data from your Iceberg changelog table into your newly created mirror table. So, while your changelog table will contain every change made to the source table, the mirror table will only contain the latest state of each key.
To do this, run the following SQL MERGE command:
MERGE INTO db.accounts_mirror a USING db.accounts_changelog c
ON a.account_id = c.account_id
WHEN MATCHED AND c._cdc.op = 'D' THEN DELETE
WHEN MATCHED THEN UPDATE
    SET a.balance = c.balance,
        a.last_updated = c.last_updated
WHEN NOT MATCHED AND c._cdc.op != 'D' THEN
    INSERT (account_id, balance, last_updated)
    VALUES (c.account_id, c.balance, c.last_updated);
However, there are two remaining challenges.
First, the changelog table should be consumed incrementally using the recommendations from the incremental processing recipe.
Second, the changes need to be deduplicated. Remember from the MERGE recipe that each target row (identified by account_id) can be updated by only one source row. Because the incoming data may contain multiple updates, the MERGE logic needs to find the latest copy of an incoming row.
To prepare the incoming data, update the simple MERGE command from above to use the following common table expressions (CTEs) that use a window to select the latest update.
WITH windowed_changes AS (
    SELECT
        account_id,
        balance,
        last_updated,
        _cdc,
        row_number() OVER (
            PARTITION BY account_id
            ORDER BY last_updated DESC) AS row_num
    FROM accounts_changelog_incremental_view
  ),
  accounts_changes AS (
    SELECT * FROM windowed_changes WHERE row_num = 1
  )

MERGE INTO db.accounts_mirror a USING accounts_changes c
ON a.account_id = c.account_id
WHEN MATCHED AND c._cdc.op = 'D' THEN DELETE
WHEN MATCHED THEN UPDATE
    SET a.balance = c.balance,
        a.last_updated = c.last_updated
WHEN NOT MATCHED AND c._cdc.op != 'D' THEN
    INSERT (account_id, balance, last_updated)
    VALUES (c.account_id, c.balance, c.last_updated);
All that remains is to schedule this query to run at regular intervals to keep the mirror table up to date. This approach will be just right for some use cases, but you could run into problems in some situations. To learn more about these potential pitfalls and how to avoid them, check out this series of blog posts on CDC and Iceberg.